

These rose-fabric-flowers are great to know how to make - they can be used in various fabricy projects so I thought I'd show you how to make them and then put them on a headband. This tutorial uses a hot glue gun for everything, but if you're more sewingly-inclined some of the steps can be done with a needle and thread.
__________________________________________________
__________________________________________________

What you'll need:
A hot glue gun, some fabric, some ribbon/lace a headband and some beads if you'd like.
note: this headband used to have black fabric over it but I just pulled it off to reveal a plastic headband.

First, cover the head band by putting a dab of hot-glue at the bottom of one side, then wrapping the ribbon around the head band until it gets to the other end. Then finish off with another dab of glue. I used about 70cm but it will depend on how thick your ribbon is.
Now for the roses!

Take a strip of fabric. The plan is to use all different sizes and lengths but to give you an idea, this piece is 4cm by 15cm. To have a more whimsical look, rip your fabric to leave a frayed edge (this only works with plain-woven fabric so if you're using basic cottons or quilting fabric it's fine but it won't work with things like denim, silk or knits). Then fold in half!
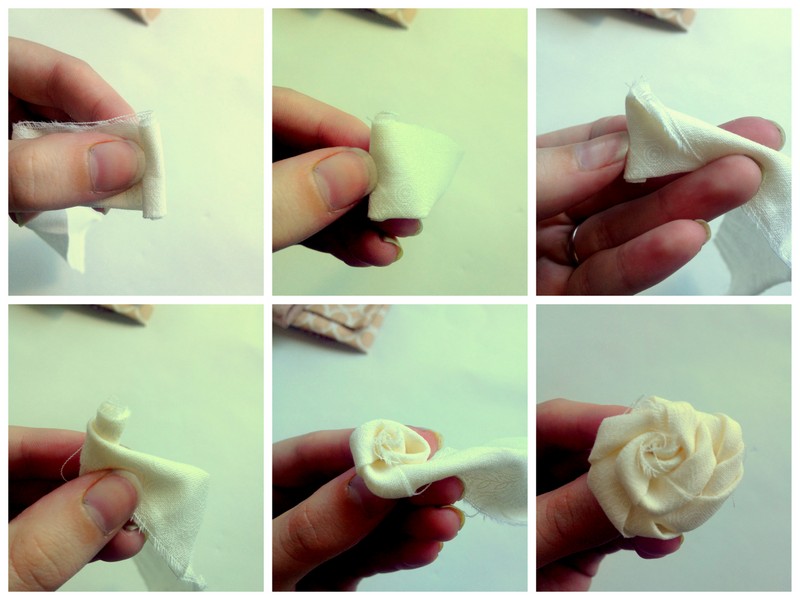
This is where the magic happens (and if you don't understand these pictures then just give it a bash and I promise it will make sense!) So first, roll up the end of your fabric. Then flip it over so that the roll is away from you. Continue rolling, but as you roll, twist the fabric over. And eventually it should look like this.

Then flip your rose over and go loco with hot-glue (or sew some strategic stitches) on the back until it's all stable and there you go.
Note: if it's looking messy, if there are threads everywhere, if it's not sitting right THAT'S OKAY. When I started doing these roses I would get discouraged because they all looked funny, but when you put them all together all those things actually MAKE the look. You WANT it to be rough and fraying because the end product will benefit and it will look soft and whimsical.


Then it's a matter of glueing down your roses onto your headband. What I found was that I immediately went for the top of the headband to put a flower on, but remember that the headband will be sitting on your head so place things thinking about how it will look at the front - not just the top. And it's supposed to be crowded - don't be afraid to shove the roses into each other and on top of each other. I then stuck little pearl-y beads all over. This helped to cover any little gaps. If you choose to add beads it's kind of all or nothing. I found that it looked rubbish with just a few but awesome with heaps.
I also chose just to put the roses on the right side because I just love the lace that's on the headband, but feel free to continue the roses all over the band.

__________________________________________________
Let me know if you have any questions and how you go making this at home!
cuuute <3
ReplyDeleteso cute! Ps are you wearing a shirt!?? Cheeky Mrs Butterworth!!!
ReplyDeleteHaha yeah it's just a baggy top :s
Delete